WebIOPi 版本更新發佈網址:Internet of Things framework
WebIOPi 說明、安裝、使用說明網址:WebIOPi
新版本 0.7 增加了很多樣東西的支援,例如 PiFace Digital 擴充卡、溫溼度感測器,還有特別支援用來支援 GertBoard 的 MCP3002 ADC 和 MCP4802 DAC 晶片,和修正一些使用者反應的問題。作者花了很長的一段時間才又推出這增強版,如果覺得 WebIOPi 好用的話,別忘了 Donote 一下以感謝他的貢獻與分享!
下面是一段關於 0.7 版的 WebIOPi 加入支援 PiFace 的展示影片,可以藉由 WebIOPi 的網頁介面控制與設定 PiFace 上的 IO 開啟與關閉的時間
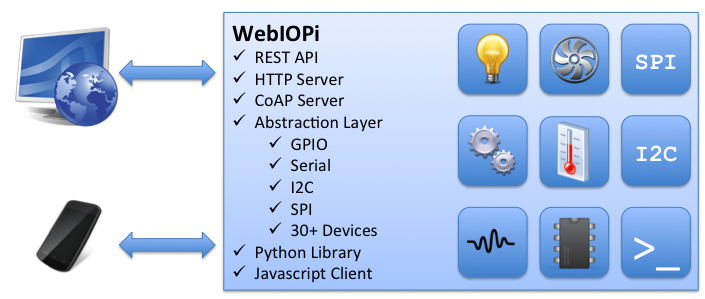
軟體架構:
 |
| source: https://code.google.com/p/webiopi/ |
 |
| source: https://code.google.com/p/webiopi/ |
 |
| source: https://code.google.com/p/webiopi/ |
Versio 0.7 (2014/03/01) 新增、修正與改善的東西:
- improved touch device handling
- updated jQuery library to version 1.11
- added PiFaceDigital driver
- added PCF8591 ADC/DAC driver
- added MCP3002 ADC driver
- added MCP4802, MCP4812, MCP4822 ADC drivers
- added HYT221 Humidity Sensor driver
- added BMP180 Temperature & Pressure Sensor driver
- added support of multiple MCP23Sxx on a single SPI CE line
- added vref argument for MCP DAC and ADC
- fixed devices monitor DAC display
- added IPv6 binding support
- added Content-Length fixed
- added HTTP and CoAP clients IP and User-Agent in logs
- added 'prompt' option in HTTP section of the config file
- fixed macro binding with -s switch
- fixed Luminosity.getLux REST mapping
- fixed Serial monitor
- fixed Serial low-level/binary handling
- fixed 1-Wire Temperature sensors error handling
- allows PiClients to run on others platforms than the Pi
- general webiopi Python library improvements
Version 0.6 (2013/03/27) 新增、修正與改善的東西:
- Added CoAP (draft-14) implementation (Server and Client)
- Added Python WebIOPi Client class (HTTP or CoAP with HTTP fallback)
- Added Python WebIOPi MulticastClient class (CoAP)
- Added Serial, I2C, SPI and 1-Wire support
- Python lightweight drivers with no dependency
- Automatically load required linux modules
- Added many device drivers, see device support page
- Added Configuration file
- Added Serial monitor web app
- Added Devices monitor web app
- Added Devices abstractions Javascript class
- Added GPIO digitalRead/Write and getFunction methods
- Added Cache-Control REST response header
- Added Server logging facility
- Added jQuery-mobile
- Improved button up/down handling on mobile devices
- Fixed error fetching python-dev package during setup
- Fixed webiopi-passwd missing execution flag when installing with PiStore
- Fixed binary file serving
- Fixed iOS6 Safari Mobile bug
 |
| Serial Monitor Web App, from: code.google.com/p/webiopi/ |
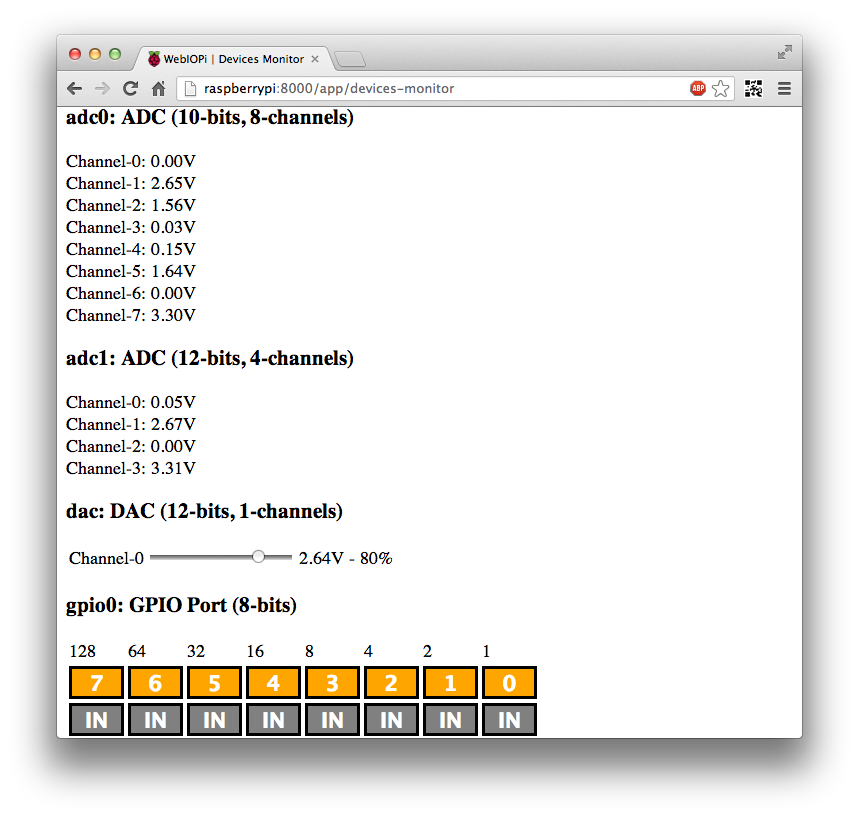
 |
| Device Monitor Web App, from: code.google.com/p/webiopi/ |
- REST API over HTTP and CoAP (draft-14) with multicast support
- Server written in Python with zero dependency
- Supports GPIO, Serial, I2C, SPI, 1-Wire with zero dependency
- Supports more than 30 devices including DAC, ADC, sensors... ( 支援的晶片很多)
- Full Python library for the Server, GPIO, Serial, I2C, SPI and devices drivers
- Compatible with both Python 2 and 3
- Extensible and highly customizable
- Login/Password protection
- Mobile devices compatible
- Includes debug web apps
- GPIO Header
- GPIO List
- Serial Monitor
- Devices Monitor
- Javascript client library built on top of jQuery
- Python client library with HTTP and CoAP support
[2013/01/08 更新]
這應該是今天才剛發佈的消息!
WebIOPi 又釋出新版本,加入了一些新功能與修正,相關的資料在近幾天會同步更新到 WIKI裡。同時,如果已經安裝 PiStore,WebIOPi 可以直接由 PiStore 或是到 Google Code 下載並安裝。
WebIOPi Changlog 與新特性的說明原文如下:
- Added board revision REST URI (submitted by Andreas Riegg)
- Added encrypted passwd file to store credentials used for HTTP authentication
- Added webiopi-passwd command-line program to generate passwd file
- Moved demo to examples/custom folder, added examples/basic
- Changed /dev/mem access to allow webiopi import without root privileges when not using GPIOs
- Disabled update checker to avoid “Update available” link
- Improved GPIO error handling
- Fixed encoding issue with python 2.x giving a blank page
- Fixed setup script
[2012/12/12 更新]

Raspberry Pi IV Beginners
Raspberry Pi Beginners Youtube 頻道,剛發佈了 WebIOPI Version 0.5.1 的安裝教學影片 (英文),如果想要使用但還未安裝,可以看一看安裝教學以及安裝之後的畫面。
ps. 影片主要針對完全未安裝的使用者,若是您像我一樣之前已經安裝過了,就請先上官網看如何做升級安裝吧!相關資料在網頁下方可以找到。
[2012/12/25 更新]
WebIOPi 版本 0.5.1 釋出,解決版本 0.5 的安裝問題。
如果之前已經安裝過 WebIOPi 舊版本想要更新為 0.5 版本,
WebIOPi UPGRADE
WebIOPi 0.5.1 下載與安裝說明:
WebIOPi INSTALL
[2012/11/17 更新]
WebIOPi 版本 0.5 釋出,主要新的功能就是支援 Rev 2.0 的 raspberry Pi 版子、安裝更加的容易、可使用 WebIOPi 在 python scripts 中、登入密碼保護、加入軟體 PWM 功能、支援二進位順序輸出、等等,詳細請上官網發佈網頁 "WwbIOPi 0.5 release"
 |
| 圖片來源:trouch.com |
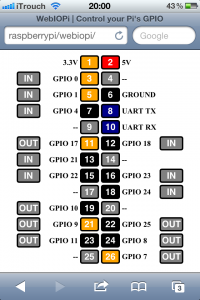
想要使用瀏覽器或是手機控制 Raspberry Pi(樹莓派)的GPIO,通過安裝 WebIOPi 在樹莓派裡就可以做到。
WebIOPi (WebIOPi WiKi:Raspberry Pi's GPIO Web interface) 是一可以經由網路瀏覽器控制樹莓派 GPIO 的應用程式,安裝之後可以從自有網路使用任一款瀏覽器來控制 GPIO 的 IO 方向、IO輸出或是輸入,不需要寫一行程式就可簡單的檢查與樹莓派連接電路的正確性,或是做為家中遠端控制介面。
 |
| 圖片來源:trouch.com |
 |
| 圖片來源:trouch.com |
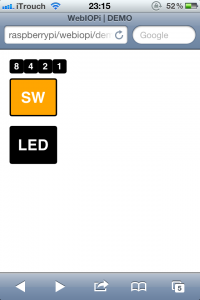
同時 WebIOPi 也提供了 Javascript library 和 REST API 讓使用者自製 GPIO 網頁控制介面,和 提供 Server Library 在 Python 中使用
 |
| 圖片來源:trouch.com |
現在的版本是 0.3 (08/27/2012) 不支援版本 2 的樹莓派。這星期 (11/xx/2012) 會出新版本 0.5,開始支援樹莓派版本 2.0 的 GPIO。各版本修改的歷史資料請看這裡:WebIOPi CHANGELOG
Ver3.0 安裝:
如果這幾天有上 http://code.google.com/p/webiopi/downloads/list 下載安裝 WebIOPi 版本0.3,
 |
| WebIOPi 下載頁面,現在還是 0.3 版本 |
解開壓縮檔在目錄裡之後,依照 http://code.google.com/p/webiopi/wiki/INSTALL 的安裝說明卻找不到相關的檔案執行與安裝。說明在壓縮檔裡面,並不是在網頁的這裡,下面是給 0.5 版本用的安裝說明。

因為我使用的 Linux 發行版本是 Occidentalis v0.2 所以像是執行 WebIOPi 需要的套件 早就安裝好了,要做的只是確保現在系統裡面的套件是不是最新的 (很久沒更新了),所以先執行一下套件更新吧!
$sudo apt-get update && apt-get upgrade -y(如果是使用 Raspbian,請參照 webiopi/doc/INSTALL 文件的說明)
因為所需套件都已安裝完成,必須讓 WebIOPi 在開機時可以自己啟動,先複製檔案到 /etc/init.d/ 目錄下去。
$sudo cp /home/pi/webiopi/webiopi.py.init /etc/init.d/webiopi開啟剛複製的 webiopi ,修改裡面的變數
$sudo nano /etc/init.d/webiopi修改 WEBIOPI_HOME=/home/pi/webiopi <-- webiopi 安裝目錄
現在您就可以藉由輸入以下兩個指令,啟動與關閉 WebIOPi
啟動:
$sudo /etc/init.d/webiopi start停止:
$sudo /etc/init.d/webiopi stop要讓 WebIOPi 在開機時自己啟動成為 Background Service,輸入下面指令
$sudo update-rc.d webiopi defaults然後重開機進行測試,在同一網路區段裡找一台電腦打開瀏覽器,輸入
http://<ip address>/webiopi例如, IP 位置是 192.168.18.11,所以網址是 http://192.168.18.11/webiopi。使用 localhost 不行時可以直接用樹莓派的 IP 位置輸入。
成功進入之後就是像最上面的那張圖片一樣的介面。
沒有留言:
張貼留言
留言屬名為"Unknown"或"不明"的用戶,大多這樣的留言都會直接被刪除掉,不會得到任何回覆!
發問問題,請描述清楚你(妳)的問題,別人回答前不會想去 "猜" 問題是什麼?
不知道怎麼發問,請看 [公告] 部落格提問須知 - 如何問問題 !