2019年3月1日 星期五

【IR #03】紅外線發射 @Arduino @ESP8266 @ESP8285


網頁最後修改時間:2019/03/01

前兩篇(〔1〕〔2〕)已經說明了關於紅外線遙控的編碼和解碼的格式,這一篇將來繼續說說以 Arduino UNO / Nano 開發板以及 ESP8266(ESP-01 / 01S)為主的紅外線 LED 發射的線路以及實際應用;當然,ESP8285(ESP-01M)同樣可用,作法參照下面網頁中的說明。

*********************************************************************************
網頁中用到的零件可到下面網址購買:
*********************************************************************************

依據所使用的的紅外線遙控/接收套件中的零件,基本上有幾種使用的方式:
  • 利用紅外線接收模組,解碼套件中紅外線(或其它)遙控器的按鍵值;
  • 接收特定紅外線遙控器訊號,並產生相對應的動作;
  • 自定義或由解碼紅外線裝置的'遙控訊號,編碼發射紅外線訊號控制遠端裝置;

Arduino UNO / Nano 和 ESP8266 對於紅外線的處理基本上都是來自於同一個函式庫,但是作者為 ESP8266 另外開了一個分支,將裡面程式碼進行了新增與修改以符和晶片需求。

兩者在發射與接收上的不同之處為:
  • 紅外線接收,兩者都是採用中斷方式;
  • 紅外線發射編碼:
    • Arduino UNO / Nano 採用 Hardware PWM;
    • ESP8266 採用 Software PWM;
其它的在函式的使用上面,兩者沒有什麼太大的差別,有的話會提示在說明中,程式碼互換相同容易!

【紅外線 LED 發射電路】

基本上,大可以把紅外線 LED 當作一般 R/G/B LED 來處理,限制電流不超過 20 mA 來做使用。但是,在【IR#02】已說過:「IR LED...其順向電流可以從 100mA 變化至遠遠超過 1A...」(例如,億光 IR333-A),所以我採用下面的電路作為紅外線 LED 發射之用。

*********************************************************************************
【請注意】
  • Arduino UNO / Nano:只能接在 <D3>,其他的接腳都不行。
  • ESP8266 / ESP8285:基本上只要能做 digitalWrite() 的都可以;程式範例是接到 <GPIO 2><VCC> 接 3.3V 或 5V 都可以
*********************************************************************************
紅外線 LED 發射電路(Arduino UNO / Nano)
例如 Arduino Nano 的實際佈線可參考下面這張照片。
紅外線 LED 發射電路(Arduino Nano)實際接線
完成 Arduino UNO/Nano 佈線之後,根據【IR#02】所介紹的方式,可取得紅外線遙控器各按鍵的解碼值。

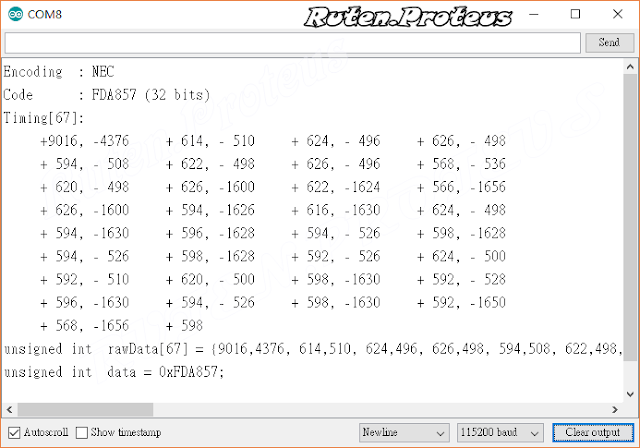
NEC 紅外線遙控器按鍵解碼輸出訊息
正確解碼之後,每個按鍵會得到下面幾個資料的輸出:
  • Encoding:代表紅外線訊號所使用的通訊協定為何;
  • Code:接收的紅外線訊號解碼值,由 Timing 陣列中的原始數據計算後得到,後面括號表示的是位元(bit)數;
  • Timing[#]:接收的紅外線訊號解碼的原始數據。其值表示的是時間(µs)、# 表示的是原始數據的數目;
  • unsigned int rawData[67]:這裡是定義上面的原始數據為一個陣列,用來作為 sendRaw() 函式的引數,控制被解碼的紅外線裝置;
  • unsigned int data = 0xFDA857:將 Code 整理成一個可用於程式的變數定義;
上面的解碼資料在實際的使用上,個人的見解是這樣的:
  1. Encoding 有被辨識出來時(例如 NEC),則建議使用 sendNEC( data, 32 ) 函式來進行紅外線訊號的編碼發射;
  2. Encoding 沒有被辨識出來時,以 sendRaw( rawData[#], #, kHz ) 函式來進行紅外線訊號的編碼發射(不過由於函式庫持續的更新,因此辨識不出來的情況不多!); 
兩種方式都可以使用,但是建議以第一個為主要的編碼發射方式,比較簡單!

第二個編碼發射方式用在無法辨識出紅外線採用的通訊協定才用,而且必須確定得到的解碼原始數據是正確的,否則有可能會失敗。另外,sendRaw() 需要按鍵解碼的原始數據,一但要處理的按鍵數量變多,則微控制器的記憶體就會不夠用,此時就需要考慮將其儲存到 flash 記憶體中,等到要用的時候再取出來。

*********************************************************************************
[ ESP8266 / ESP8285 接收解碼程式 ]

前面系列網頁的沒有說到 ESP8266 接收解碼程式的部分,在這裡補上。

這部分的解碼程式可參考函式庫裡面的範例 IRrecvDumpV2,它所輸出的紅外線解碼資料類似於 IRremote 函式庫,可相互比對。
IRremoteESP8266 範例 ESP8266_IRrecvDumpV2 測試輸出
實際的應用上,我自己還是偏向於去修改【IR#02】裡面的接收解碼程式來用,因為可以產生相同的輸出格式
*********************************************************************************

/*--*//**---/*///**---*-*////***--*/*///***----*///--*/*///**--*/*//**--**/*//
* 相同輸出格式的 ESP8266 / ESP8285 紅外線接收解碼版本(ESP8266_IRremoteReceiveV02):

IRremot 和 IRremoteESP8266 這兩個函式庫範例(都是叫做 IRrecvDumpV2),但由上面的測試中可以看到,兩者對於 rawData[] 的取得的結果有所不同,但這不表示有問題,是因為 IRremoteESP8266 函式庫增加了對於冷氣紅外線遙控器的支援,導致它會接收某個時間區隔的訊號。但接下來的網頁中,為了讓程式保持一致並不考慮空調紅外線遙控器的部分,我們會使用 IRremote 的 IRrecvDumpV2 的程式進行修改為 IRremoteESP8266 適用的版本,這樣的修改可以保證得到的數據格式兩者都是相同的。

另外在接線上,ESP-01/01S 不像 ESP8285 ESP-01M 有著較多的接腳可以用,因此可供選擇的接腳只有 <UTXD><URxD><GPIO0><GPIO2> 這四根但一定要注意燒錄與開機的時候什麼接腳需要拔掉?避免無法進入燒錄與正常執行模式。

另外要提醒的是,<UTxD><URxD> 作為紅外線發射或是接收接腳時,若要同時使用 HardwareSerial ,則需要加上以下指令:

// 使用 <URxD>
Serial.begin(115200, SERIAL_8N1, SERIAL_TX_ONLY);
// 使用 <UTxD>
Serial.begin(115200, SERIAL_8N1, SERIAL_RX_ONLY);
// 其他接腳
Serial.begin(115200);

完整的接收程式碼如下所示,

/**
* ESP8266_IRremoteReceiveV02.ino
* IRRemote 的 IRecvDumpV2.ino 做為參考,稍微修改後使用。
* 接收 IR 訊號並解碼出相關的訊息與數據,再輸出到 Serial。
*
* {Compile}
* + ESP8266 Core for Arduino v2.4.2
* + IRremoteESP8266 v2.5.5
*
* {Wiring}
* ESP-01/01S VS1838B
* ------------------
* GND -
* 3V3 +
* #3(URXD) S
*
* {Result} Work!
*
*/
//------------------------------------------------------------------------------
// Include the IRremote library header
//
#ifndef UNIT_TEST
#include <Arduino.h>
#endif
#include <IRutils.h>
//------------------------------------------------------------------------------
// Tell IRremote which Arduino pin is connected to the IR Receiver (TSOP4838)
//
int recvPin = 3; // GPIO3 = URXD,
IRrecv irrecv(recvPin);
//+=============================================================================
// Configure the Arduino
//
void setup() {
Serial.begin(115200,SERIAL_8N1,SERIAL_TX_ONLY);
irrecv.enableIRIn();
Serial.print( "\n\nReady!\n\n" );
}
//+=============================================================================
// Display IR code
//
void ircode (decode_results *results) {
// Panasonic has an Address
if (results->decode_type == PANASONIC) {
Serial.print(results->address, HEX);
Serial.print( ":" );
}
// Print Code
serialPrintUint64(results->value, 16);
}
//+=============================================================================
// Display encoding type
//
void encoding (decode_results *results) {
switch (results->decode_type) {
default:
case UNKNOWN: Serial.print( "UNKNOWN" ); break;
case UNUSED: Serial.print( "UNUSED" ); break;
case RC5: Serial.print( "RC5" ); break;
case RC6: Serial.print( "RC6" ); break;
case NEC: Serial.print( "NEC" ); break;
case SONY: Serial.print( "SONY" ); break;
case PANASONIC: Serial.print( "PANASONIC" ); break;
case JVC: Serial.print( "JVC" ); break;
case SAMSUNG: Serial.print( "SAMSUNG" ); break;
case WHYNTER: Serial.print( "WHYNTER" ); break;
case AIWA_RC_T501: Serial.print( "AIWA_RC_T501" ); break;
case LG: Serial.print( "LG" ); break;
case SANYO: Serial.print( "SANYO" ); break;
case MITSUBISHI: Serial.print( "MITSUBISHI" ); break;
case DISH: Serial.print( "DISH" ); break;
case SHARP: Serial.print( "SHARP" ); break;
case COOLIX: Serial.print( "COOLIX" ); break;
case DAIKIN: Serial.print( "DAIKIN" ); break;
case DENON: Serial.print( "DENON" ); break;
case KELVINATOR: Serial.print( "KELVINATOR" ); break;
case SHERWOOD: Serial.print( "SHERWOOD" ); break;
case MITSUBISHI_AC: Serial.print( "MITSUBISHI_AC" ); break;
case RCMM: Serial.print( "RCMM" ); break;
case SANYO_LC7461: Serial.print( "SANYO_LC7461" ); break;
case RC5X: Serial.print( "RC5X" ); break;
case GREE: Serial.print( "GREE" ); break;
case PRONTO: Serial.print( "PRONTO" ); break;
case NEC_LIKE: Serial.print( "NEC_LIKE" ); break;
case ARGO: Serial.print( "ARGO" ); break;
case TROTEC: Serial.print( "TROTEC" ); break;
case NIKAI: Serial.print( "NIKAI" ); break;
case RAW: Serial.print( "RAW" ); break;
case GLOBALCACHE: Serial.print( "GLOBALCACHE" ); break;
case TOSHIBA_AC: Serial.print( "TOSHIBA_AC" ); break;
case FUJITSU_AC: Serial.print( "FUJITSU_AC" ); break;
case MIDEA: Serial.print( "MIDEA" ); break;
case MAGIQUEST: Serial.print( "MAGIQUEST" ); break;
case LASERTAG: Serial.print( "LASERTAG" ); break;
case CARRIER_AC: Serial.print( "CARRIER_AC" ); break;
case HAIER_AC: Serial.print( "HAIER_AC" ); break;
case MITSUBISHI2: Serial.print( "MITSUBISHI2" ); break;
case HITACHI_AC: Serial.print( "HITACHI_AC" ); break;
case HITACHI_AC1: Serial.print( "HITACHI_AC1" ); break;
case HITACHI_AC2: Serial.print( "HITACHI_AC2" ); break;
case GICABLE: Serial.print( "GICABLE" ); break;
case HAIER_AC_YRW02: Serial.print( "HAIER_AC_YRW02" ); break;
case WHIRLPOOL_AC: Serial.print( "WHIRLPOOL_AC" ); break;
case SAMSUNG_AC: Serial.print( "SAMSUNG_AC" ); break;
case LUTRON: Serial.print( "LUTRON" ); break;
case ELECTRA_AC: Serial.print( "ELECTRA_AC" ); break;
case PANASONIC_AC: Serial.print( "PANASONIC_AC" ); break;
case PIONEER: Serial.print( "PIONEER" ); break;
case LG2: Serial.print( "LG2" ); break;
case MWM: Serial.print( "MWM" ); break;
}
}
//+=============================================================================
// Dump out the decode_results structure.
//
void dumpInfo (decode_results *results) {
// Check if the buffer overflowed
if (results->overflow) {
Serial.println( "IR code too long. Edit IRremoteInt.h and increase RAWBUF" );
return;
}
// Show Encoding standard
Serial.print( "Encoding : " );
encoding(results);
Serial.println("");
// Show Code & length
Serial.print( "Code : " );
ircode(results);
Serial.print( " (" );
Serial.print(results->bits, DEC);
Serial.println( " bits)" );
}
//+=============================================================================
// Dump out the decode_results structure.
//
void dumpRaw (decode_results *results) {
// Print Raw data
Serial.print( "Timing[" );
Serial.print(results->rawlen-1, DEC);
Serial.println( "]: " );
for (int i = 1; i < results->rawlen; i++) {
unsigned long x = results->rawbuf[i] * RAWTICK;
if (!(i & 1)) { // even
Serial.print( "-" );
if (x < 1000) Serial.print(" ") ;
if (x < 100) Serial.print(" ") ;
Serial.print(x, DEC);
} else { // odd
Serial.print( " " );
Serial.print( "+" );
if (x < 1000) Serial.print(" ") ;
if (x < 100) Serial.print(" ") ;
Serial.print(x, DEC);
if (i < results->rawlen-1) Serial.print( ", " ); //',' not needed for last one
}
if (!(i % 8)) Serial.println("");
}
Serial.println(""); // Newline
}
//+=============================================================================
// Dump out the decode_results structure.
//
void dumpCode (decode_results *results) {
// Start declaration
Serial.print( "unsigned int " ); // variable type
Serial.print( "rawData[" ); // array name
Serial.print(results->rawlen - 1, DEC); // array size
Serial.print( "] = {" ); // Start declaration
// Dump data
for (int i = 1; i < results->rawlen; i++) {
Serial.print(results->rawbuf[i] * RAWTICK, DEC);
if ( i < results->rawlen-1 ) Serial.print(","); // ',' not needed on last one
if (!(i & 1)) Serial.print(" ");
}
// End declaration
Serial.print( "};" );
// Comment
Serial.print( " // " );
encoding(results);
Serial.print( " " );
ircode(results);
// Newline
Serial.println("");
// Now dump "known" codes
if (results->decode_type != UNKNOWN) {
// Some protocols have an address
if (results->decode_type == PANASONIC) {
Serial.print( "unsigned int addr = 0x" );
serialPrintUint64(results->address, 16);
Serial.println(";");
}
// All protocols have data
Serial.print( "unsigned int data = 0x" );
serialPrintUint64(results->value, 16);
Serial.println( ";" );
}
}
//+=============================================================================
// The repeating section of the code
//
void loop() {
decode_results results; // Somewhere to store the results
if (irrecv.decode(&results)) { // Grab an IR code
dumpInfo(&results); // Output the results
dumpRaw(&results); // Output the results in RAW format
dumpCode(&results); // Output the results as source code
Serial.println(""); // Blank line between entries
irrecv.resume(); // Prepare for the next value
}
}
程式碼下載

執行程式後,同樣發送相同的紅外線按鍵,會得到類似下面的輸出。其中 Code 和 rawData 就是分別餵給 sendNEC() 和 sendRaw() 這兩個函式的資料,其中 sendEncoding()要根據 Encoding 解碼出的通訊協定選用不同的函式。

上面用的紅外線接收解碼程式,將會用到接下來部落格撰寫的 IR Web Server 的程式中,有興趣的請先花點時間看。
ESP8266_IRremoteReceiveV02 程式執行輸出

【紅外線發射測試程式碼】

下面以 【IR#01】網頁中的 AdaIRemoteIRKeyDecode.ino 程式碼來做為接收端,負責接收並解碼紅外線訊號。

/*--*//**---/*///**---*-*////***--*/*///***----*///--*/*///**--*/*//**--**/*//
* Arduino 開發板:

程式碼中的 line 26 - 42 要填入紅外線遙控器按鍵對應的解碼值,然後編譯上傳至 Arduino 開發板,只要兩者的編解碼正確,接收端就會輸出相對應的文字訊息與顯示在 OLED 上。

#include "IRremote.h"
IRsend irsend; // D3 as IR sending pin
const String hint = "0...9, #, *, u(UP), d(DOWN), r(RIGHT), l(LEFT), o(OK)\r\nSelect IR Key to send: ";
void setup() {
Serial.begin( 115200 );
Serial.println( F("IR Emitter Ready...") );
Serial.println();
delay( 1000 );
}
void loop() {
char c;
Serial.print( hint );
while( !Serial.available() );
c = Serial.read();
Serial.println( c );
switch( c ) {
case '1': sendKey( 0x###### ); break; // 1
case '2': sendKey( 0x###### ); break; // 2
case '3': sendKey( 0x###### ); break; // 3
case '4': sendKey( 0x###### ); break; // 4
case '5': sendKey( 0x###### ); break; // 5
case '6': sendKey( 0x###### ); break; // 6
case '7': sendKey( 0x###### ); break; // 7
case '8': sendKey( 0x###### ); break; // 8
case '9': sendKey( 0x###### ); break; // 9
case '0': sendKey( 0x###### ); break; // 0
case '*': sendKey( 0x###### ); break; // #
case '#': sendKey( 0x###### ); break; // *
case 'u': sendKey( 0x###### ); break; // UP
case 'd': sendKey( 0x###### ); break; // DOWN
case 'r': sendKey( 0x###### ); break; // RIGHT
case 'l': sendKey( 0x###### ); break; // LEFT
case 'o': sendKey( 0xFDA857 ); break; // OK
default:
break;
} // end switch
}
void sendKey( unsigned long ircode ) {
for( int i = 0; i < 3; i++ ); { // 預設發送三次
irsend.sendNEC( ircode, 32 ); // unsigned long data, int nbits
delay(100);
}
}
程式碼下載

/*--*//**---/*///**---*-*////***--*/*///***----*///--*/*///**--*/*//**--**/*//
* ESP8266 / ESP8285 模組:

同樣與 Arduino 開發板使用相同的發射程式,但採用不同的函式庫,比較兩者就能看出不同之處,IRremoteESP8266 函式庫需要:
  • 程式宣告(line 8)時,要同時指定使用於發射(或接收)的接腳;
  • 作為紅外線發射之前,必須要先下(line 13) .begin() 的指令,才能開始使用發射的其他指令;
#ifndef UNIT_TEST
#include <Arduino.h>
#endif
//#include <IRutils.h>
#include <IRsend.h>
IRsend irsend(2); // 使用 ESP8266 的接腳 <GPIO0> / <GPIO2> 燒錄時要拔掉
const String hint = "0...9, #, *, u(UP), d(DOWN), r(RIGHT), l(LEFT), o(OK)\r\nSelect IR Key to send: ";
void setup() {
irsend.begin();
Serial.begin( 115200 );
Serial.println( F("IR Emitter Ready...") );
delay( 1000 );
}
void loop() {
char c;
Serial.print( hint );
while( !Serial.available() );
c = Serial.read();
Serial.println( c );
switch( c ) {
case '1': sendKey( 0x###### ); break; // 1
case '2': sendKey( 0x###### ); break; // 2
case '3': sendKey( 0x###### ); break; // 3
case '4': sendKey( 0x###### ); break; // 4
case '5': sendKey( 0x###### ); break; // 5
case '6': sendKey( 0x###### ); break; // 6
case '7': sendKey( 0x###### ); break; // 7
case '8': sendKey( 0x###### ); break; // 8
case '9': sendKey( 0x###### ); break; // 9
case '0': sendKey( 0x###### ); break; // 0
case '*': sendKey( 0x###### ); break; // #
case '#': sendKey( 0x###### ); break; // *
case 'u': sendKey( 0x###### ); break; // UP
case 'd': sendKey( 0x###### ); break; // DOWN
case 'r': sendKey( 0x###### ); break; // RIGHT
case 'l': sendKey( 0x###### ); break; // LEFT
case 'o': sendKey( 0xFDA857 ); break; // OK
default:
break;
} // end switch
}
void sendKey( unsigned long ircode ) {
for( int i = 0; i < 3; i++ ); { // 預設發送三次
irsend.sendNEC( ircode, 32 ); // unsigned long data, int nbits
delay(100);
}
}
程式碼下載

/*--*//**---/*///**---*-*////***--*/*///***----*///--*/*///**--*/*//**--**/*//
* 原始數據(raw data)的發送:

使用原始數據發送紅外線訊號是比較不建議的方式,看看上面的 rawData[] 所佔據的位元組數目就知道這個方式很佔記憶體,建議可以將資料移動到程式記憶體中,要不直接使用晶片的 SRAM 一下子就會增量很多,尤其是 Arduino 一下就爆掉了,所以下面的範例用 ESP8266 (ESP8285 也可以)來做,將紅外線遙控器上按鍵的原始解碼數據全部填入到程式中,然後利用 UART 輸入相對應的按鍵值來發射紅外線訊號。

/******************************************************************************
* ESP8266_IRSendRaw.ino
* UART 選擇發送解碼後的 IR Key 出去給接收端,rawData 紀錄在 RAM。
* IR Key 使用的是 results.rawbuf
*
* {Compile}
* + ESP8266 Core for Arduino v2.4.2
* + IRremoteESP8266 v2.5.5
*
* {Result} WORK!
*
*/
#ifndef UNIT_TEST
#include <Arduino.h>
#endif
//#include <IRutils.h>
#include <IRsend.h>
// IRsend irsend(0); // 與下行產生同樣的情況
IRsend irsend(2); // ESP8266 GPIO pin (GPIO 2) to use. 燒錄時要拔掉,重新開機時也要拔掉。
uint16_t irkey_raw_0[] = { "填入紅外線解碼後 rawData[] ={這裡的數值}" };
uint16_t irkey_raw_1[] = { "填入紅外線解碼後 rawData[] ={這裡的數值}" };
uint16_t irkey_raw_2[] = { "填入紅外線解碼後 rawData[] ={這裡的數值}" };
uint16_t irkey_raw_3[] = { "填入紅外線解碼後 rawData[] ={這裡的數值}" };
uint16_t irkey_raw_4[] = { "填入紅外線解碼後 rawData[] ={這裡的數值}" };
uint16_t irkey_raw_5[] = { "填入紅外線解碼後 rawData[] ={這裡的數值}" };
uint16_t irkey_raw_6[] = { "填入紅外線解碼後 rawData[] ={這裡的數值}" };
uint16_t irkey_raw_7[] = { "填入紅外線解碼後 rawData[] ={這裡的數值}" };
uint16_t irkey_raw_8[] = { "填入紅外線解碼後 rawData[] ={這裡的數值}" };
uint16_t irkey_raw_9[] = { "填入紅外線解碼後 rawData[] ={這裡的數值}" };
uint16_t irkey_raw_s[] = { "填入紅外線解碼後 rawData[] ={這裡的數值}" };
uint16_t irkey_raw_n[] = { "填入紅外線解碼後 rawData[] ={這裡的數值}" };
uint16_t irkey_raw_u[] = { "填入紅外線解碼後 rawData[] ={這裡的數值}" };
uint16_t irkey_raw_d[] = { "填入紅外線解碼後 rawData[] ={這裡的數值}" };
uint16_t irkey_raw_l[] = { "填入紅外線解碼後 rawData[] ={這裡的數值}" };
uint16_t irkey_raw_r[] = { "填入紅外線解碼後 rawData[] ={這裡的數值}" };
uint16_t irkey_raw_o[] = { 8992, 4428, 568, 524, 612, 524, 600, 528, 560, 524, 616, 524, 600, 524, 564, 524, 616, 524, 600, 1612, 612, 1652, 560, 1664, 600, 1612, 612, 1720, 496, 1656, 608, 548, 536, 1660, 608, 1608, 612, 524, 600, 1612, 612, 528, 600, 1612, 612, 512, 612, 532, 560, 524, 608, 512, 612, 1616, 608, 516, 612, 1616, 608, 512, 612, 1620, 604, 1640, 584, 1640, 588 };
void setup() {
irsend.begin();
Serial.begin( 115200 );
Serial.println( F("Start sending IR Key Code") );
delay( 1000 );
}
void loop() {
Serial.print( F("0...9, #, *, u(UP), d(DOWN), r(RIGHT), l(LEFT), o(OK)\r\nSelect IR Key to send: ") );
while( !Serial.available() );
char c = Serial.read();
Serial.println( c );
switch( c ) {
case '0': irsend.sendRaw( irkey_raw_0 , sizeof( irkey_raw_0 ) / sizeof( irkey_raw_0[0] ), 38 ); break; // 0
case '1': irsend.sendRaw( irkey_raw_1 , sizeof( irkey_raw_1 ) / sizeof( irkey_raw_1[0] ), 38 ); break; // 1
case '2': irsend.sendRaw( irkey_raw_2 , sizeof( irkey_raw_2 ) / sizeof( irkey_raw_2[0] ), 38 ); break; // 2
case '3': irsend.sendRaw( irkey_raw_3 , sizeof( irkey_raw_3 ) / sizeof( irkey_raw_3[0] ), 38 ); break; // 3
case '4': irsend.sendRaw( irkey_raw_4 , sizeof( irkey_raw_4 ) / sizeof( irkey_raw_4[0] ), 38 ); break; // 4
case '5': irsend.sendRaw( irkey_raw_5 , sizeof( irkey_raw_5 ) / sizeof( irkey_raw_5[0] ), 38 ); break; // 5
case '6': irsend.sendRaw( irkey_raw_6 , sizeof( irkey_raw_6 ) / sizeof( irkey_raw_6[0] ), 38 ); break; // 6
case '7': irsend.sendRaw( irkey_raw_7 , sizeof( irkey_raw_7 ) / sizeof( irkey_raw_7[0] ), 38 ); break; // 7
case '8': irsend.sendRaw( irkey_raw_8 , sizeof( irkey_raw_8 ) / sizeof( irkey_raw_8[0] ), 38 ); break; // 8
case '9': irsend.sendRaw( irkey_raw_9 , sizeof( irkey_raw_9 ) / sizeof( irkey_raw_9[0] ), 38 ); break; // 9
case '*': irsend.sendRaw( irkey_raw_s , sizeof( irkey_raw_s ) / sizeof( irkey_raw_s[0] ), 38 ); break; // #
case '#': irsend.sendRaw( irkey_raw_n , sizeof( irkey_raw_n ) / sizeof( irkey_raw_n[0] ), 38 ); break; // *
case 'u': irsend.sendRaw( irkey_raw_u , sizeof( irkey_raw_u ) / sizeof( irkey_raw_u[0] ), 38 ); break; // UP
case 'd': irsend.sendRaw( irkey_raw_d , sizeof( irkey_raw_d ) / sizeof( irkey_raw_d[0] ), 38 ); break; // DOWN
case 'r': irsend.sendRaw( irkey_raw_r , sizeof( irkey_raw_r ) / sizeof( irkey_raw_r[0] ), 38 ); break; // RIGHT
case 'l': irsend.sendRaw( irkey_raw_l , sizeof( irkey_raw_l ) / sizeof( irkey_raw_l[0] ), 38 ); break; // LEFT
case 'o': irsend.sendRaw( irkey_raw_o , sizeof( irkey_raw_o ) / sizeof( irkey_raw_o[0] ), 38 ); break; // OK
default:
break;
} // end switch
}
程式碼下載

實際的應用比較少直接使用原始數據來做紅外線訊號的發射,但在這邊就是只是說明紅外線解碼原始數據要和哪一個函式來搭配使用而已,主要還是以各通訊協定搭配的函式為主。

至於 Arduino 的部分,請自行參考 IRremote 函式庫裡面的範例。

【結論】

到這篇為止,對於紅外線的發射/接收以及通訊協定什麼的,基本的都已經說明完畢。

接下來我將利用這個套件的所有東西,結合 ESP8266 和 Google Spreadsheet 建置一個以網頁做為管理紅外線訊號的介面的 IR Web Server, 學習網站的前端、後端和雲端三方怎麼做結合。


<< 部落格相關文章 >>

8 則留言:

  1. 不知道為什麼,現在才看到這篇文章,我們自己用類似的方式作成了紅外線發射器,另外還有一個資料庫 https://irdb.tih.tw 歡迎參觀

    回覆刪除
    回覆
    1. 這幾天找時間瀏覽了 "台灣智慧家庭(Taiwan Intelligent Home,TIH)",分享紅外線發射資料的部分 (https://irdb.tih.tw/) 很不錯,我應該要找時間試試這些數據以及取得的方法。

      我看到 "網路小遙" (https://www.zeczec.com/projects/IRHaruka) 好像外殼的部分是用再生紙來做的,這部分若是有需要介紹廠商去設計外型的話,接近中山大學附近(楠梓區)有廠商可以做,他應該會很樂意與你們一起合作!

      刪除
  2. 您好,想請教一下,如果decode_type是UNKNOWN的情況下,我使用sendRaw的方式,不過試了原本的IRremote的lib也試了ESP8266,還是無法控制,如果是在非UNKNOWN的情況下,我是可以透過紅外線的方式來控制,希望有機會能與您討論,我也在台南,謝謝

    回覆刪除
    回覆
    1. 沒有函式庫裡的解碼型式就會是 UNKNOWN,若是要用 sendRaw(...) 傳送,就必須保證多次所解碼出來的 rawData[] 是一致的而不是特例,這樣傳送後才會正確被接收端所接受。

      刪除
    2. 我試了將近50次的接收,發現每次的數值都有一些不一樣...@@,在arduino這是不是就無解了阿?

      刪除
    3. 這跟 arduino 沒關係!要看紅外線遙控器使用的晶片或是廠牌,解碼的方式會有所不同?不一定解碼後所輸出的資料都會每一次都一樣。 可以查一查你的紅外線遙控器的相關資料,一般市面上的紅外線遙控器訊號大多都已被解碼出來,相關資訊可以查一下最上面一則的回答。

      刪除
  3. 為什麼普遍使用 38khz 的 NEC protocol?
    好像都沒有看到什麼理由,或是使用上的優缺點 ...:)

    回覆刪除

留言屬名為"Unknown"或"不明"的用戶,大多這樣的留言都會直接被刪除掉,不會得到任何回覆!

發問問題,請描述清楚你(妳)的問題,別人回答前不會想去 "猜" 問題是什麼?

不知道怎麼發問,請看 [公告] 部落格提問須知 - 如何問問題 !